User Interface
Now that we have a functioning server, let's jump into the user interface! This application uses the React.js framework and D3.js. If you're not familiar with React, I suggest finding a tutorial to get familiar with the concepts and basic mechanics. We'll again be using TypeScript for our React code to help us add compile-time type-checking.
Exploring the User Interface
The user interface sub-project lives inside the client folder of our repository. Inside client/src is our application code.
The entry point of the application is App.tsx. This code uses react-router to allow us to link URLs to various scenes of our application. Once we've built-up our entry point we embed the application into the DOM.
// client/src/App

import React from "react";
import ReactDom from "react-dom";
import { BrowserRouter } from "react-router-dom";
import { LayoutScene } from "./scenes/layout/LayoutScene";

ReactDom.render(
  <BrowserRouter>
    <LayoutScene />
  </BrowserRouter>,
  document.getElementById("app")
);
From this you will see that we render a single component, <LayoutScene>. It lives inside client/src/scenes/layout. Inside this folder is where we define things related to our application layout.
The LayoutScene component is also where we use react-router to define our various scenes based on the URL path.
// client/src/scenes/layout/LayoutScene

import React from "react";
import { Route, Routes } from "react-router-dom";
import { AppNav } from "./components/AppNav";
import { GraphScene } from "../graph/GraphScene";

export const LayoutScene = () => {
  return (
    <div className="layout">
      <div className="container-fluid mb-3">
        <AppNav />
      </div>
      <Routes>
        <Route path="/" element={<GraphScene />} />
      </Routes>
    </div>
  );
};
Here you can see that inside the <Routes> component we define a single <Route> that is bound to the root path /. This route renders the GraphScene component which renders our graph!
So our folder structure looks like this:
client\
  src\
    App.tsx
    scenes\
      layout\
        LayoutScene.tsx
      graph\
        GraphScene.tsx
And our code component hierarchy looks like this:
App
  LayoutScene
    GraphScene
Each of the scenes can also have components that are specific to the the scene. These are stored inside the components folder inside each scene.
client\
  src\
    App.tsx
    scenes\
      layout\
        LayoutScene.tsx
        components\
          NavBar.tsx
      graph\
        GraphScene.tsx
        components\
          Graph.tsx
Because we're already ran npm run watch at the root of the application, our client side code is already being built for us.
This command builds the React application and place it into the dist folder.
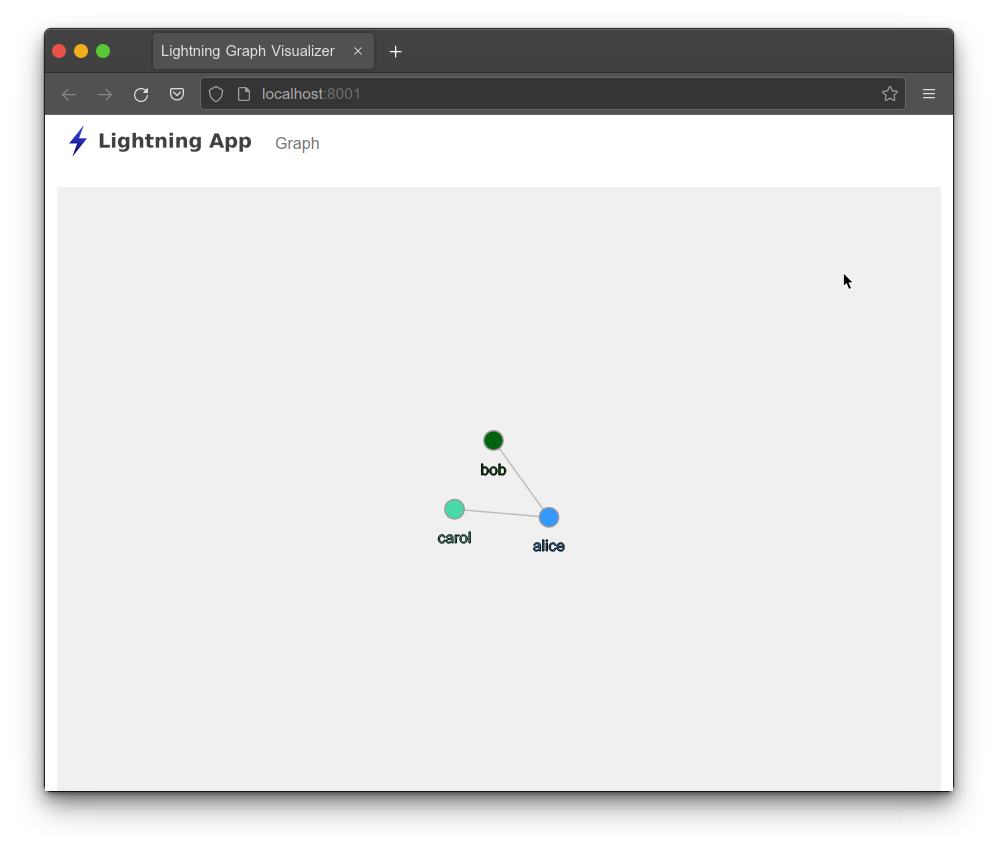
You can now use your browser to navigate to http://localhost:8001 and view the application!

Exercise: Loading the Graph
Our next task is wiring up the graph API we previously created to our user interface. To make our life easier we will use an ApiService to house the calls to our API.
In your IDE, navigate to /client/src/services/ApiService.ts and create a method that uses the get helper get to retrieve the graph.
// client/src/services/ApiService

import { Lnd } from "./ApiTypes";

export class ApiService {
  constructor(readonly host: string = "http://127.0.0.1:8001") {}

  protected async get<T>(path: string): Promise<T> {
    const res = await fetch(path, { credentials: "include" });
    return await res.json();
  }

  // Exercise: Create a public fetchGraph method that returns Promise<Lnd.Graph>.
  // You can use the get helper method above by supplying it with the path /api/graph.
  public async fetchGraph(): Promise<Lnd.Graph> {
    return undefined;
  }
}
This class is conveniently accessible by using the useApi hook located in the hooks folder. By adding our fetchGraph method to the ApiService, we can gain access to it with the useApi hook inside any component which we will do in a moment! Feel free to take a look at the useApi hook code and if you're confused read up on React hooks.
Exercise: Wire up the API Call
Next let's point our IDE at the GraphScene component in client/src/scenes/graph so we can wire up the API to a component.
For this exercise, inside the useEffect hook, call the api.fetchGraph method. Be mindful that this method returns a promise, which you will need to retrieve the results from and call graphRef.current.createGraph method to start the rendering process. The console.log will output the graph object into the browser's console window.
// client/src/scenes/graph/GraphScene

import React, { useEffect, useRef } from "react";
import { useApi } from "../../hooks/UseApi";
import { Graph } from "./components/Graph";

export const GraphScene = () => {
  const api = useApi();
  const graphRef = useRef<Graph>();

  useEffect(() => {
    // Exercise: Using the api, call the fetchGraph method. Since this returns a promise,
    // we need to use the `then` method to retrieve the results. With the results, call
    // `graphRef.current.createGraph`
    api.fetchGraph().then((graph: Lnd.Graph) => {
      console.log(graph);
      // Todo
    });
  }, []);

  return (
    <div className="container-fluid h-100">
      <div className="row h-100">
        <div className="col h-100">{<Graph ref={graphRef} />}</div>
      </div>
    </div>
  );
};
Dev Note: The useEffect hook has two arguments: a callback function and an array of variables that when changed will trigger the callback function. Providing an empty array means our callback function will only be called when the component mounts, which is the functionality we are looking for.
Dev Note: Promises are a mechanism for working with asynchronous operations. When a promise completes, the results are passed as an argument to the then function. This will look something like api.fetchGraph().then(graph => { /* do something here */ }).
Dev Note: In order to avoid the cors error, you should use the same base url for frontend and backend of the project. Since the frontend calls the backend on 127.0.0.1 you should also open the frontend by navigating to http://127.0.0.1:8001. Using a url like http://localhost:8001 will result in a cors error.
When you refresh your browser, you should now see a graph!
Graph Component Overview
The Graph component, client/src/scenes/graph/components/Graph, is a bit different from a normal React component because it is encapsulating D3. Typically React is in charge of rendering the DOM. For this component, React will only control the SVG element. D3 will take control of the SVG element and render elements into it.
React interfaces with D3 via two methods on the component: createGraph and updateGraph. Each method takes information from our domain and converts it into objects that D3 can control and render.
For those familiar with React this may be a bit weird since we are transitioning from the declarative style of programming used by React and using imperative code to call these functions. If that's a little confusing, take a gander at GraphScene and Graph. Notice that GraphScene renders Graph as a child, but we use the createGraph method to push information into D3.
createGraph is responsible for converting our Lnd.Graph object into objects that can be understood by D3.